 Recently, my 5-year-old son discovered some fabric that was perfect for a good friend of mine who is the biggest Wonder Woman fan we know. He actually pointed it out in the store to her, and was promptly proud of himself for such a great find (I love that kid!).

With her birthday approaching, I knew I wanted to make something with the newly-discovered fabric. It had to be fun and functional, because she loves fashion, but she’s also practical. Searching through ideas on the internet, I found a tutorial for a key ring wristlet and bought a pattern for a zippered clutch that was perfect!
I designed a second clutch for another friend who is also a fan of (or might actually be) Wonder Woman using some different accent fabrics and a different pattern/style (because, you know, we can’t have two WW clutches floating around that are exactly the same). Both friends were ecstatic about the designs, and all was well in the world (or at least in our little part of it).
After completing those projects, I started looking for scrap-buster projects that would work with my leftover material. I made a semi-successful attempt at a headband (a post for another day), but I’m actually one of those people who can’t seem to keep a headband in my hair for some reason or another. They start slowly working their way up in the back until I look like a weird, windblown Bride of Frankenstein with my hair pulled back into a very loose, whole-head sized ponytail.
Apparently, I’m not the only woman with an odd-shaped head that refuses to be tamed by an elastic band with non-slip silicone adhered to the back, so my friend (recipient of the second clutch) suggested making hair ties. What a perfect solution to both use up the leftover fabric scraps and give headband-impaired women something cute and useful.
Here’s how to do it yourself, with an easy-peasy-lemon-squeezy (as my 5-year-old would say – did I mention I love this kid?!) alternative at the bottom of this post.
Simple Hair Ties
Supplies:
- Fabric scraps, roughly 8 x 2.5 inches each (you will need two pieces)
- Paper, cardboard, or any other material for your pattern (roughly 8 x 2.5 inches)
- Marker
- Scissors (craft & fabric – Don’t use fabric scissors for anything other than fabric; it’s like a cardinal sin of sewing)
- Hair tie of your choice – I like the “seamless” kind, but use what you have/like
- Iron & ironing board/surface
- Sewing machine and notions
What to do:
-

Size and pattern shape reference. I made my pattern a little too narrow in the middle for turning, so I cut a little bigger than the pattern piece. Make your pattern. (Yes, you! I promise you can do it!) Since this is a mirrored image, fold your pattern paper (or cardboard, or whatever you’re using) in half lengthwise. You want to draw a basic leaf shape with the tip of the leaf away from the fold. Keeping it folded, cut out the pattern shape. Unfold and, viola!, you have yourself a pattern.
- Trace your pattern on the wrong side of the fabric with a marker. Do this twice, for front and back pieces. Honestly, I just use permanent marker for this, because you’re going to be sewing the marker lines into the seam allowance anyway. Others might suggest using something that will wash out later, but I do things my own way (just ask my mom, or anyone who has ever met me, for that matter).
- Cut out both fabric pieces and sandwich them with right sides together. Pin around the edges.
- Using a 1/8-inch seam allowance, straight stitch around the edges of the bow, leaving a 1-1/2 inch opening in the middle section on one side. Be sure to back-stitch at the beginning and end to keep the stitching in place.
-

Catch the material in the crook of a fat crochet hook and it’s easy to pull it right-side-out Turn the bow right side out through the opening in the middle. I like to use a really fat crochet hook for turning projects because it doesn’t poke through the material, but you just do you, and feel free to use whatever you can find that will do the trick. Tuck the opening area into the seam allowance and finger-press the opening closed.
- Iron your bow. (Fun fact: I rarely iron anything in my house – ever – except when I’m sewing; then, I iron everything. Twice.) I know you’re thinking, “Do I have to iron it?” Yes, you do. Because I said so. And because it’s listed in the supplies. Skipping this step is denying yourself the satisfaction of the most professional looking hair tie bow you can make, and you don’t want to be deprived of that, do you?! I didn’t think so.
- Set your straight stitch to a longer stitch setting (roughly 3 to 3.5) and top-stitch around the edge of your bow as close to the outer edge as possible, being sure to stitch your opening closed in the middle.
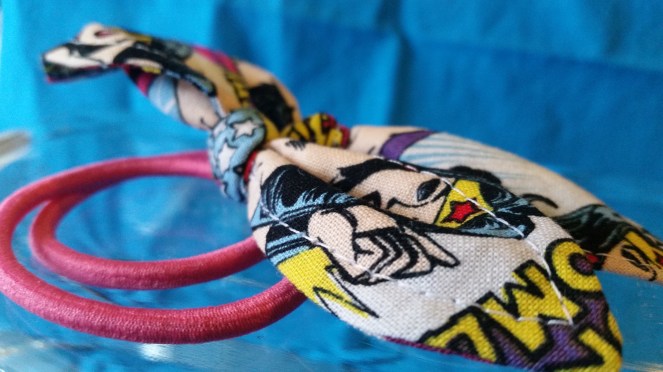
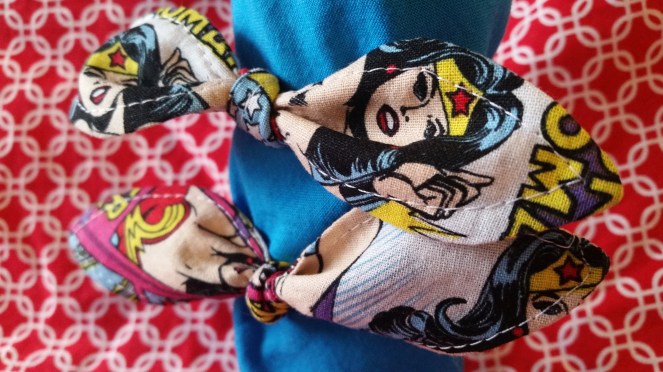
- Tie the bow in a knot around the hair tie, and admire your beautiful new creation!
****Alternately, you could skip Steps 3-7 (and use a disappearing ink marker for tracing your pattern on your fabric in Step 2), cut out your pattern pieces and pin them with wrong sides together, and sew a zig-zag or overcast stitch around the outside edges, completing the project with Step 8. This would give the bow a more arts & crafts appearance, as some fraying will occur naturally with wear and washing.
