
Since my mom will be on a pilgrimage in Bosnia during Mother’s Day, I completed her Mother’s Day gift a little early. I found this wonderful tutorial for creating an infinity scarf that doubles as a shawl – perfect for changing climates during travel. And, it’s something she can wear while traveling, so that means one less thing to try to squeeze into her luggage (although she’s pretty well a pro at it by now – and yes, there is a lot of sitting on things to get them closed).
The only thing I did differently than the tutorial was adding some lightweight fusible interfacing in the hems of the scarf, mostly to keep everything from getting all stretchy on me during sewing. It worked beautifully!
Once I finished the scarf, I decided I wanted to add a little something extra to the gift. My mom normally ties colorful ribbons to her luggage so she can more easily identify her bags (the standard black that almost all travelers use). Although the ribbons are effective, they aren’t the prettiest (the last time I looked, she had mixed lilac ribbon with a plaid Christmas-colored tie). So, cute new luggage tags seemed to be in order.
After extensive searching, I decided no such pattern/tutorial existed for the style of luggage tags I liked using the methods I thought would produce the best results. So, I did what I usually do when faced with this situation – I Frankensteined my way through it, pulling bits from this blog, and pieces from this one, and winging it on my own for some of it. To save you the hassle of going through such a task, I’m sharing how I made them.
A note before you get started: I typically prefer to group all of my cutting, ironing, and sewing together because I have limited space to work in and I’d rather do it in stations (that’s how this tutorial is set up), but I’ve tried to make it easier to jump around in case you find it easier to work with one piece at a time. Also, please excuse the photo improv for steps that I didn’t photograph during the original project; they should help clarify some of the steps, though, so I wanted to include them.
Okay, let’s get started!
Pretty Luggage Tags
Supplies:
- Two fat quarters of fabric – this is enough to make 9 complete tags, with a little bit of material leftover
- 9 – 12 x 3.5 inch cuts of Craft-Fuse or similar firm fusible interfacing (the size of one fat quarter)
- 9 – 9 x 3.5 inch cuts of light or medium-weight fusible interfacing (less than one fat quarter)
- 9 – 3 x 4 inch cuts of clear vinyl of some sort (I used part of the tablecloth I cut up on this project)
- Iron
- Large grid ruler (or regular ruler)
- Cutting mat and rotary cutter (not necessary, but immensely simplifies this project)
- Quilting clips (or similar style hair barrettes, clothespins, etc.)
- Nine eyelets and tools for setting
- X-acto knife or other precise, sharp cutting tool
- Twine, ribbon, or elastic loops (hair ties would work, too)
- Sewing machine, thread, and other notions
- Walking foot for your sewing machine (optional, but recommended)
What to do:
CUTTING:
- Fabric A: Cut the fat quarter (18 x 21) you will be using for the tag part as follows:
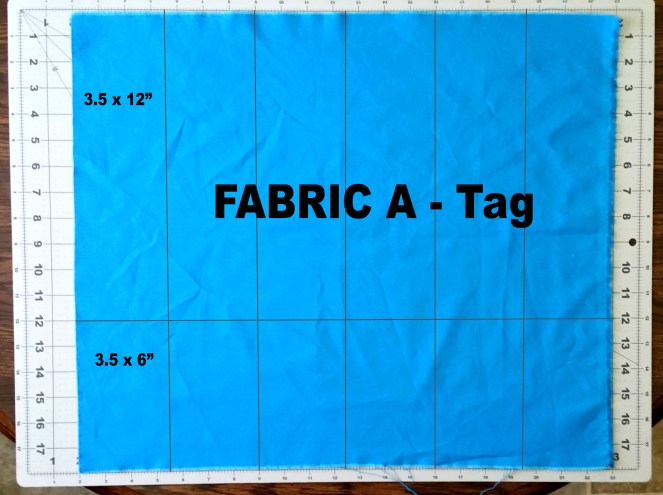 (This is for reference; I used the black paisley fabric for the tags I made.) You may need to square off fabric if it’s really wonky. It’s okay if your fabric is just a little bit short on one end; all of the edges are within the seam allowance. If you aren’t using a fat quarter, you can go ahead and just cut 9 rectangles that are 3.5 x 12 inches.
 - Fabric B: Cut the fat quarter (18 x 21) you will be using for the see-through frame as follows:
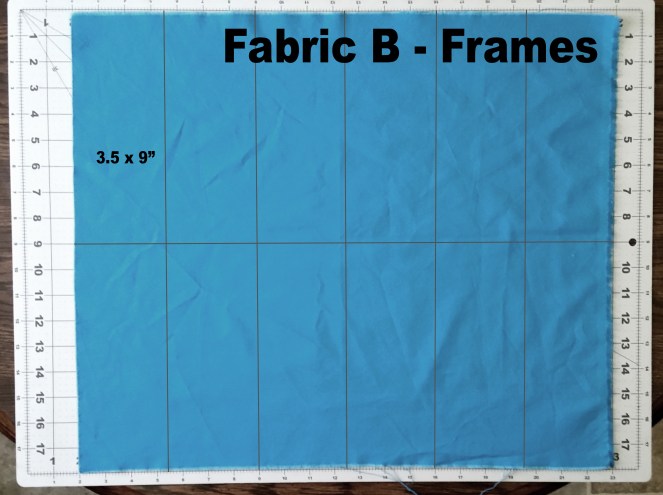 (This is for reference; I used the orange paisley fabric for my frames.) You may need to square off fabric if it’s really wonky. It’s okay if your fabric is just a little bit short on one end; all of the edges are within the seam allowance. If you aren’t using a fat quarter, just cut 9 rectangles that are 3.5 x 9 inches.
 - If you haven’t done so already, cut your interfacing now. You can go ahead and cut the vinyl now, too, if you want, but I waited to do so until I was ready to use it, mainly because that stuff hides really well and I had to iron mine before cutting – more on that in Step 2 under “IRONING, Part 3.”
IRONING:
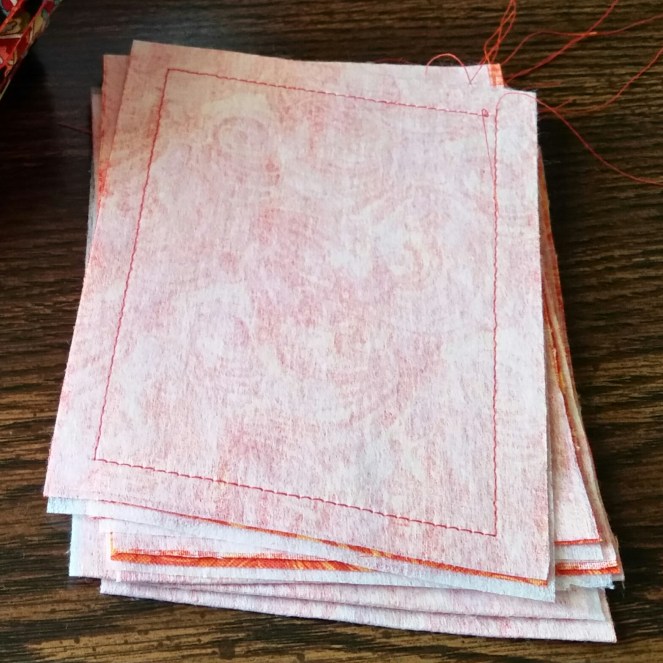
- Fabric A: Use an iron to fuse the Craft-Fuse to the wrong side of the fabric cuts. For the 6-inch cuts, just place two fabric rectangles (end to end) on one Craft-Fuse cut. Then, fold each fused piece in half with right sides facing to make a 6 x 3.5 inch sandwich; iron on the fold to crease it.
- Fabric B: Fuse the lightweight interfacing to the wrong side of the fabric cuts. Then, fold each piece in half with right sides together to make a 4.5 x 3.5 inch sandwich; iron on the fold to crease.
CUTTING, Part 2:
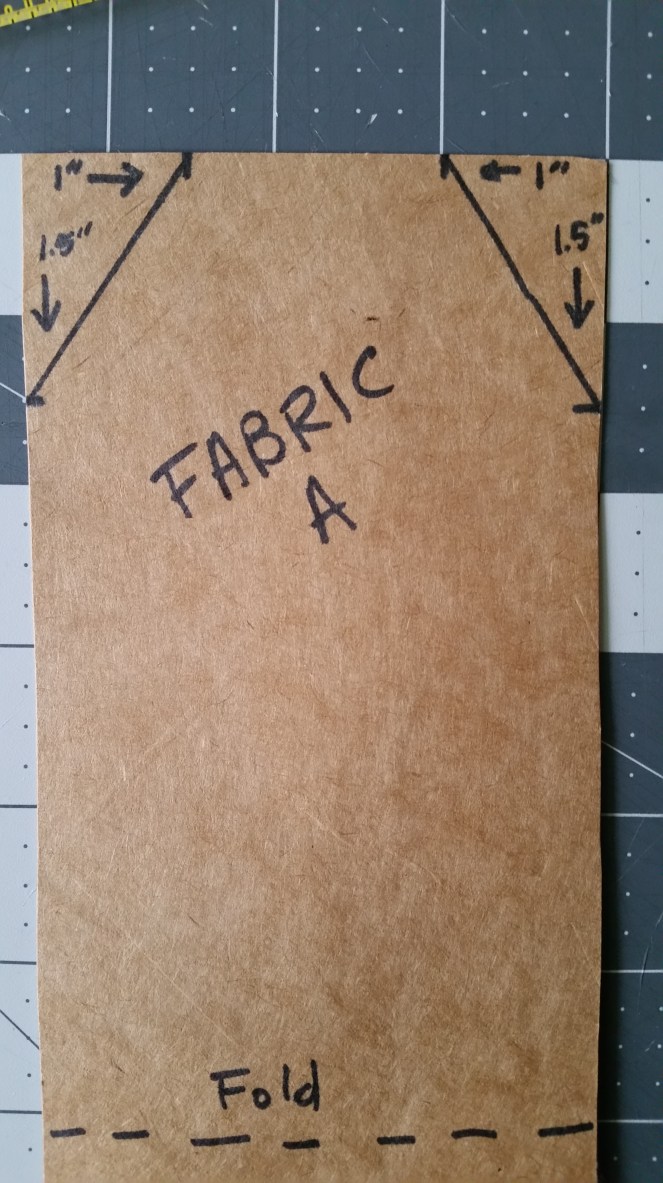
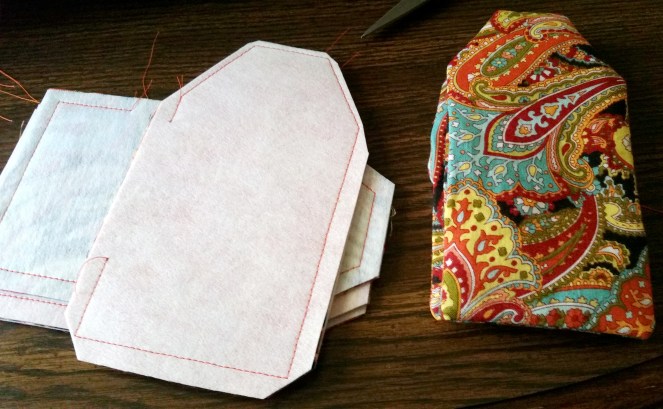
- Fabric A: With the folded edge at the bottom, clip the top corners of each fabric sandwich by measuring in 1 inch from either side and measuring down 1.5 inch from the top.
SEWING:
- Fabric A: If you don’t have a walking foot, pin around the outside edges of each tag. Using a straight stitch, sew an 1/2 inch seam all the way around, leaving a 3-inch opening on one long edge for turning. Be sure to back-stitch to secure the stitching.
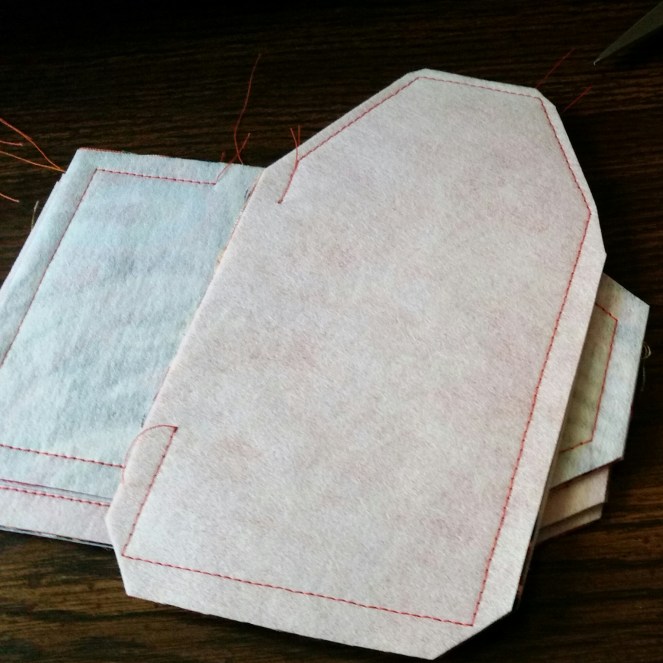 (Please note, this also shows the cuts you will be making in the next step.)
 - Fabric B: If you don’t have a walking foot, pin around the outside edges of each fabric sandwich. Using a straight stitch, sew an 1/2 inch seam all the way around – Do Not leave an opening. Yes, you will be sewing this completely closed with the right sides together.
CUTTING, Part 3:
- Fabric A: Clip the corners and trim any excess fabric/interfacing on each tag, particularly around the top. Turn right-side out using the opening you left in the seam. Push out corners with a point turner, chopstick, or other similar tool, tucking in the fabric at the opening.
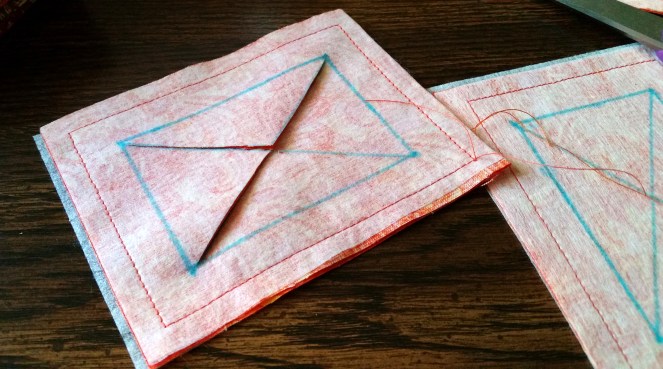
- Fabric B: Using a ruler and fabric marking pen, draw a rectangle 3/4 inch inside the stitch line on each frame piece. Now, draw a line from corner to corner on both diagonals to create an X inside the rectangle you just created. Fold the fabric in half near the middle of the X and make a small cut through both pieces of fabric, big enough to get your scissors through. Carefully cut along the lines of the X (through both pieces of fabric), stopping just before the stitching. I find my small, pointy scissors to be more precise at this, but a good pair of fabric scissors will work nicely, too. It’s not a big deal if you cut outside of the lines toward the middle of the X to get started, but be more careful cutting toward the corners.
IRONING, Part 2:
- Fabric A: Tucking the opening into the tag at the seam line, iron each tag to its finished size/look.
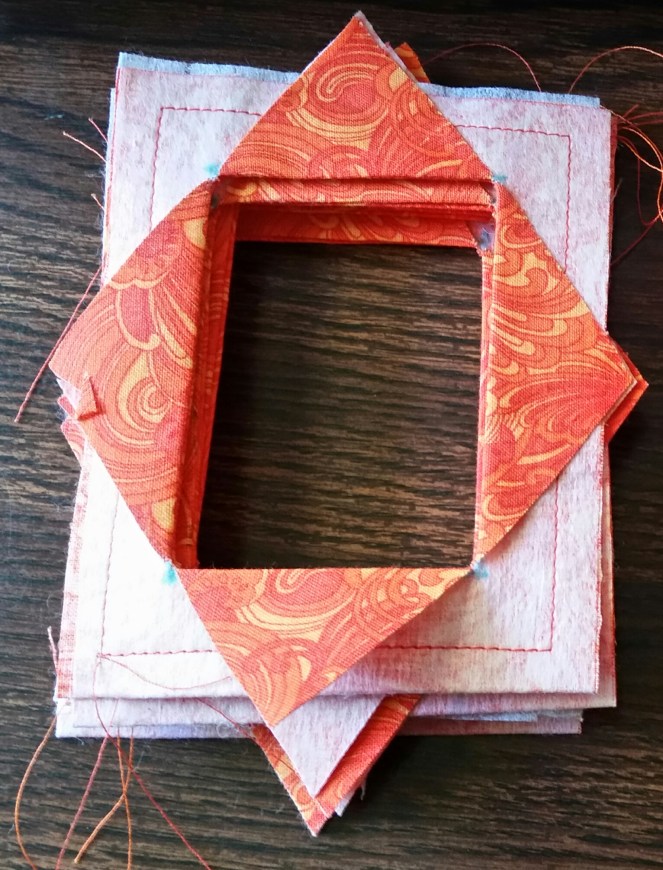
- Fabric B: Starting with the side that has the X drawn on it, open up the triangle on all four sides of the top layer only so that the right side of the fabric is facing up. (You will still have the bottom triangles – right side up through the opening – pointing toward the center.) Press triangle pieces open. Flip over, and repeat for the opposite side. This photo shows a completed set (with the triangles pressed open on both sides).
CUTTING, Part 4:
- Fabric B: Clip each of the four outside corners of each frame piece for easier turning, and trim the tops of each triangle (on both sides) so that they do not extend beyond the stitching line.
IRONING, Part 3:
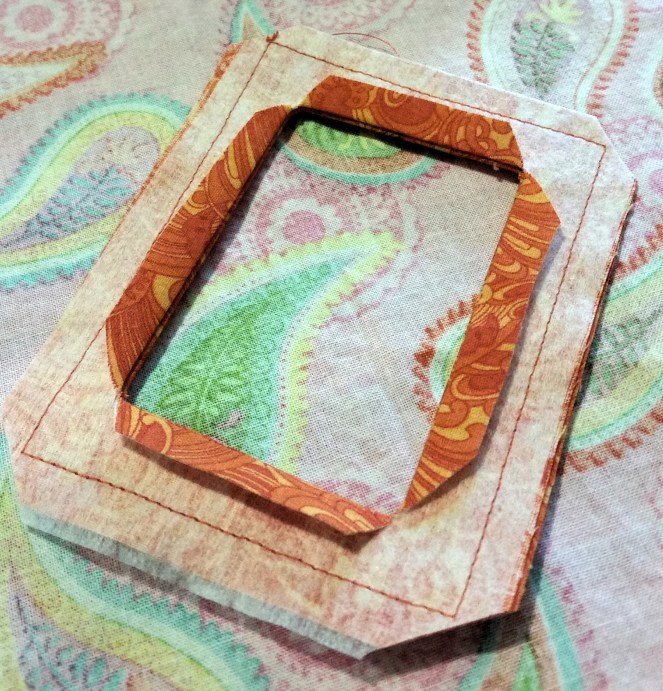
- Fabric B: Turn each frame piece right side out, keeping the clipped triangle pieces tucked into the seam. Press the frames flat.
- If your vinyl is a repurposed tablecloth that’s been haphazardly shoved into a craft bin and is all wrinkly, let’s go ahead and iron that now, too. Set your iron to its lowest heat setting. Once it has cooled to a lower temp, cover your vinyl with a thicker piece of cotton material; iron over the top of the cotton material, careful not to stay in one spot for more than 15 seconds at a time. Once you’ve ironed the area of vinyl needed for this project, lift the fabric to see the results; repeat the steps again (and perhaps again, if necessary) until the vinyl has smoothed out. Now would also be the time to cut your vinyl if you haven’t already done so.
SEWING, Part 2:
- Insert one vinyl cut into each frame. I found it to be easiest by inserting one corner at a time, using a clip to secure the vinyl before going to the next corner. (Is it weird that I purchased these clips from the craft store, but I have the exact same style of barrettes for my hair?)
 Once you have the entire piece of vinyl in place, you can remove one or two of the clips before sewing. If you don’t have a walking foot on your machine, you may need to use a nonstick foot (you can place a piece of scotch tape on the bottom of your regular sewing foot, leaving an opening for the needle to pass through) or place a piece of tissue paper over the vinyl to keep it from sticking to the presser foot. (If I were to go this route, I would tuck the tissue under the top frame piece so that any bits that don’t tear apart after sewing would be hidden by the frame.) Using a straight stitch and a narrow seam allowance, topstitch around the interior frame fabric to secure the vinyl window. (Notice the stitching close to the interior edge. The remaining stitching is covered in the following step.)
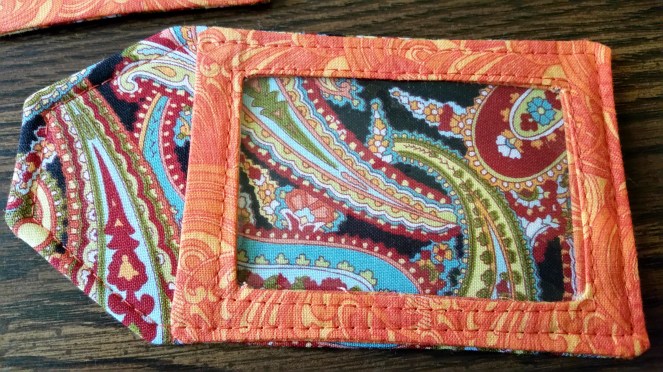
- Clip or pin the frame piece to one of the tag pieces and topstitch with a narrow seam allowance around the entire outer edge of the tag, making sure to sew the opening on the tag piece closed in the process. Do not sew along the top of the frame window – this is your opening to slip your information into the window.
FINISHING LUGGAGE TAGS:
- Use an X-acto knife or other small, sharp implement to cut a small X in the middle of the top of each tag, cutting through all layers of material. Push the eyelet piece through the hole (cut it larger, if needed, but be careful not to cut too far) and secure using your eyelet tools.
- Cut about 15 inches length of twine or ribbon and fold in half. Push the loop of the twine/ribbon (or one end of an elastic loop) through the eyelet, pulling enough of the loop through to insert the loose ends (or the other end of the elastic) through it. Pull the loose ends until secure.
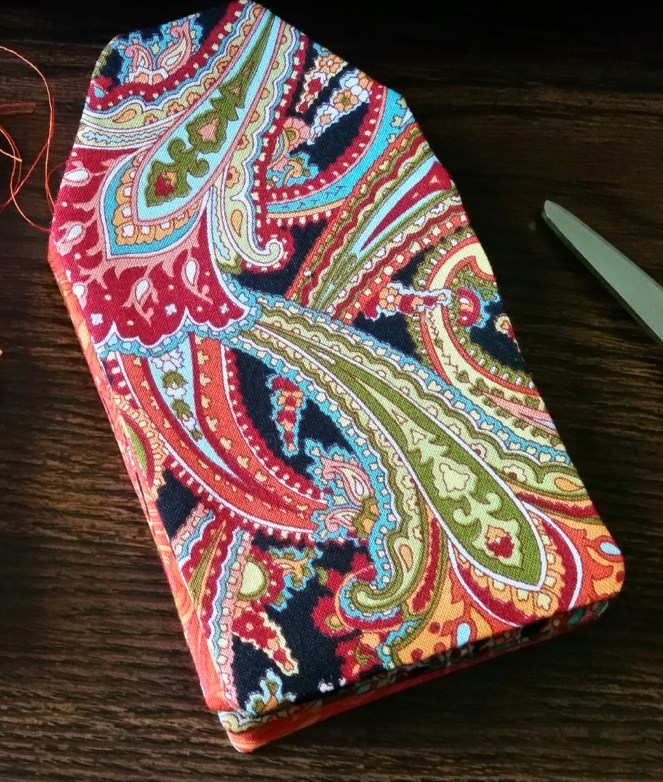
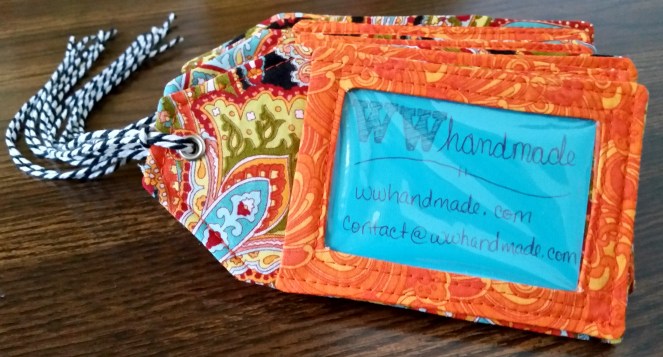
- Tie tags onto your favorite luggage (for elastic loops, pull the remaining loop through a zipper pull or around a handle and starting from the bottom of the tag, push the tag through the loop to secure it), or package for gift-giving!
Finally, you’re done!!!
This is a very lengthy project, but simple enough for the dedicated beginner! I actually worked on these a little bit each day during my lunch period, finishing up the last few steps all at once last weekend. And I just love the end result!

Definitely I project I want to try!
LikeLike